DTF Printing is reshaping how designers and brands customize apparel with durable, vibrant transfers. This beginner-friendly guide to direct-to-film transfers also covers DTF printing explained, helping readers grasp the basics, equipment, and workflow. You’ll learn how to do DTF printing, from design prep and white underbases to adhesion and curing, with practical, step-by-step notes. The piece also highlights DTF printer setup, color management, and common mistakes to avoid. Along the way, you’ll pick up DTF transfer tips for optimizing temps, pressure, and fabric compatibility to achieve consistent results.
Viewed through a broader lens, this approach is a film-based transfer method—often described as polymer-film printing or ink-on-film workflow—that offers flexibility for on-demand apparel. From a practical standpoint, the direct-to-film technique sits between DTG and screen printing in cost, setup, and scalability, while using heat and adhesive to bond designs to fabric. Latent Semantic Indexing (LSI) principles guide the use of related terms such as film-based transfer, polymer-film workflow, and ink-on-film to support search relevance. As you explore the setup, materials, and tips, the underlying idea remains the same: print on a film, apply adhesive, and transfer with heat to produce durable, vibrant designs on a wide range of fabrics. As you grow, you’ll encounter related topics like film durability, post-press care, and substrate compatibility, all part of the broader DTF ecosystem.
DTF Printing Fundamentals: Direct-to-Film Transfers Demystified
DTF Printing, or Direct-to-Film transfers, sits at an intersection between DTG and screen printing, offering a balance of quality, speed, and setup cost. When people ask about DTF printing explained, they’re really exploring a workflow that uses a PET film, white ink for opacity, and a final adhesive powder to bond the image to fabric. This approach makes it easier to achieve vibrant colors on a wide range of textiles while keeping equipment requirements modest compared to traditional screen printing setups.
Understanding direct-to-film transfers helps you see why many creators choose DTF printing for small runs and on-demand designs. The process emphasizes film-based image transfer, reliable color reproduction, and a softer hand feel than some alternative methods. By starting with the basics of DTF printing explained here, you’ll gain a clear sense of how the film, ink, and powder work together to produce durable, high-quality transfers.
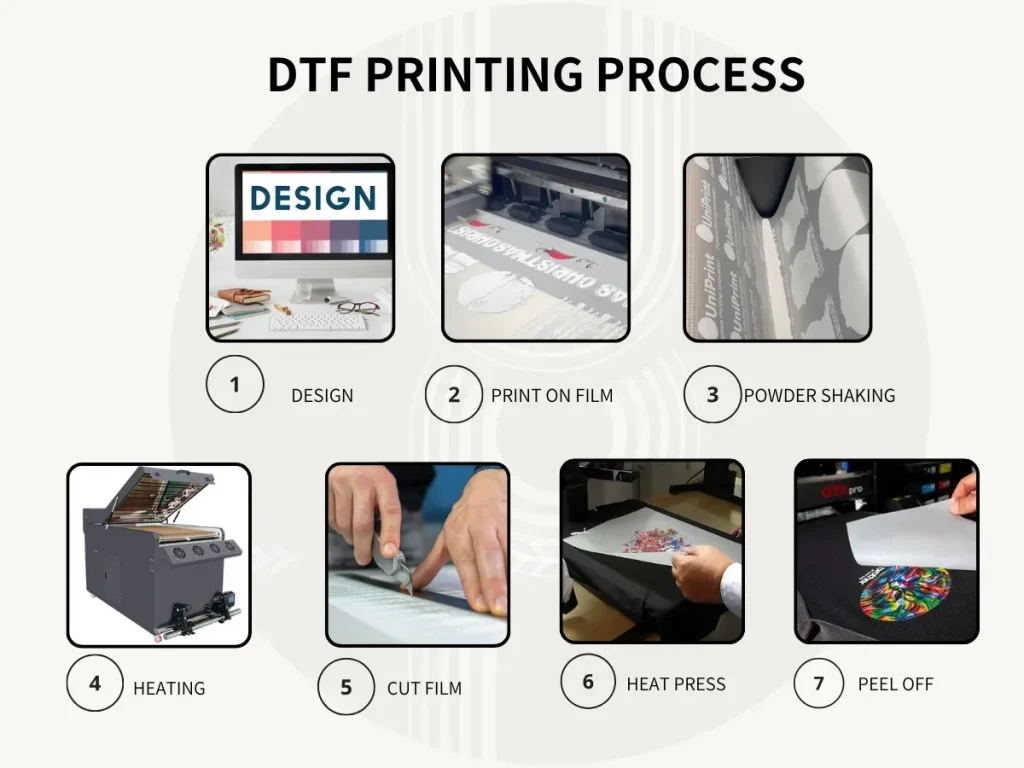
How to Do DTF Printing: A Beginner-Friendly Step-by-Step Workflow
If you’re wondering how to do DTF printing, this beginner-friendly workflow breaks the process into manageable stages. Begin with design and preparation, ensuring proper color separation and sizing for your target garments. This is your foundation for successful direct-to-film transfers and sets the stage for predictable results across batches.
The workflow continues with printing on PET film using CMYK inks plus white ink as needed, followed by powder application and curing. By following these steps—design prep, film printing, powder curing, and final transfer—you’ll develop a reliable routine that aligns with best practices in DTF transfer tips and helps minimize common issues like color shifts or poor adhesion.
DTF Printer Setup and Color Management for Consistent Results
DTF printer setup goes beyond loading film and inks; it requires careful attention to color management to maintain consistency across prints. Establish reliable print profiles that reflect your specific inks and film, and integrate RIP software or a robust color management workflow to control dithering, separations, and print order. Regular calibration and nozzle checks are essential to sustain crisp details in direct-to-film transfers.
In practice, strong DTF transfer tips include maintaining stable humidity and temperature for film handling, performing routine maintenance on white ink reservoirs, and using ICC profiles that match your media. With a disciplined DTF printer setup, you’ll minimize color drift and ensure that every transfer matches the intended design, making future projects more predictable and scalable.
Choosing the Right Materials for DTF Transfers
Selecting the right materials is foundational for successful direct-to-film transfers. The DTF workflow relies on high-quality DTF PET film, reliable white ink for opacity where needed, and an adhesive powder that bonds the print to fabric during heat pressing. When discussing DTF printing explained, these components—and their proper handling—are often highlighted as the building blocks of a durable transfer.
Beyond the film and ink, consider fabrics, surface prep, and compatibility with your powders and heat-press settings. Some fabrics benefit from pre-treatment or a different adhesive layer to optimize adhesion and color fidelity. These material choices link directly to practical DTF transfer tips, helping you tailor the process to each garment while avoiding subpar results.
Troubleshooting DTF Transfers: Common Issues and Practical Fixes
Despite careful setup, issues can arise in DTF transfers. Common problems include color bleeding, under- or over-adhesion, powder clumping, or film wrinkles. Applying targeted DTF transfer tips—such as verifying ink density, ensuring even powder distribution, and testing transfer temperatures—can help diagnose and correct these challenges before full production.
A practical troubleshooting approach involves using test swatches on similar fabrics, checking post-press care guidelines, and reviewing alignment and pressure consistency. By addressing each potential bottleneck—print quality, powder curing, heat-press duration—you’ll reduce waste and improve overall transfer reliability, reinforcing your ability to deliver professional results.
Sustaining Quality: Care, Durability, and Future-Proofing Your DTF Projects
Sustaining quality in DTF projects means planning for durability and ease of care. Post-press handling, garment care instructions, and washing guidelines all influence long-term performance of the transfer. By adhering to best practices for DTF printing explained and ensuring the finished product withstands routine use, you’ll extend the life of your designs and maintain customer satisfaction.
Looking ahead, focus on process documentation, batch-consistency checks, and ongoing optimization of equipment and materials. As you gain experience with direct-to-film transfers, you’ll refine your DTF printer setup, color management, and workflow, enabling scalable production and reliable outcomes across a broader range of fabrics and designs.
Frequently Asked Questions
DTF printing explained: what is Direct-to-Film printing and how do direct-to-film transfers work?
DTF printing explained: Direct-to-Film printing involves printing a design onto a PET film using CMYK inks with optional white ink, then applying an adhesive powder and curing it. The film is heat-pressed onto fabric to create a durable transfer. This method sits between DTG and screen printing in cost and scalability and is popular for small runs and multi-fabric applications.
How to do DTF printing: what is the recommended beginner workflow for direct-to-film transfers?
How to do DTF printing: start with a simple workflow—design prep with proper color separation, print on PET film using CMYK (plus white where needed), apply a light layer of adhesive powder, cure the powder, position the film on the garment, and heat-press. Finish with a proper peel and post-press if required by your film and ink specs.
DTF printer setup: what equipment and settings are essential for starting with DTF transferring?
DTF printer setup essentials include a printer capable of white ink alongside CMYK, DTF PET film, adhesive powder, a heat press, a curing device, and protective gear. Use RIP software or color management with consistent ICC profiles, maintain regular nozzle checks, and calibrate alignment to ensure sharp details and color accuracy across batches.
DTF transfer tips: what are best practices to ensure durable transfers on various fabrics?
DTF transfer tips: prep the fabric surface, test on similar materials, and verify fabric compatibility. Use correct transfer temperature (around the typical 160°C/320°F range), time, and pressure, ensure the powder is fully cured, and follow the recommended peel method. Post-press care and proper storage of film and powder help maintain durability.
DTF printing explained: how does DTF compare to DTG and screen printing in terms of cost, quality, and scalability?
DTF printing explained: compared with DTG and screen printing, DTF offers lower setup costs and greater flexibility for small runs and varied fabrics, with vibrant color and good durability. It usually has faster turnaround and simpler prep than traditional screen printing, while potentially requiring ongoing expenses for film, powder, and white ink maintenance.
DTF transfer tips: what are common issues and how can I troubleshoot DTF printing problems?
DTF transfer tips: common issues include color shifts, powder clumping, and misalignment. Troubleshoot by checking ink density and underbase strength, ensuring even powder distribution and full cure, verifying transfer temperature and time, maintaining printer alignment, and keeping film and powder stored correctly to prevent degradation.
| Topic | Key Points |
|---|---|
| What is DTF Printing? | Direct-to-Film printing uses CMYK inks with white ink on PET film, followed by adhesive powder and heat pressing to create durable transfers; positioned between DTG and screen printing in cost and scalability. |
| Key components for DTF Printing | Printer capable of white ink plus CMYK, DTF PET film, White ink, Adhesive powder, Heat press, Curing device/oven, Heat-resistant surface, RIP software, Scissors/squeegee/release film. |
| Understanding the DTF process | Film-ready workflow: artwork prep with color separation; print on PET film (CMYK + white); apply adhesive powder; cure; transfer with heat; peel and post-press as needed. |
| Step-by-step guide for beginners (DTF transfer workflow) | Design & prep; Print settings with ICC profiles; White underbase for non-white fabrics; Powder & cure; Transfer settings (e.g., 160°C/320°F, 15–20s); Peel method. |
| DTF printer setup and color management | Establish color management; maintain white ink; humidity/temperature for film storage/printing; calibrate printer; use RIP software for separations and print order. |
| Direct-to-film transfers and quality tips | Clean fabric surface pre-press; test swatches; verify fabric compatibility; post-press care; quality control of transfers. |
| DTF printing explained and common questions | DTF explained: design printed on polymer film with white underbase; bonded via adhesive powder and heat; compares to DTG and screen printing; cost, speed, and scalability considerations; maintenance. |
| Troubleshooting and best practices | Color bleed, under-/over-adhesion, powder clumps, film wrinkles; solutions: check ink density/underbase, ensure even powder, verify temp/time, maintain equipment, store film/powder properly; follow fabric compatibility and maintenance routines. |
| Conclusion | DTF Printing offers a practical, scalable path to high-quality transfers. By mastering the fundamentals, components, and steady workflow, you can produce vibrant designs across fabrics and colors; with experimentation, beginners can reach professional-grade apparel customization. |
Summary
DTF Printing is a practical, scalable method for creating high-quality T-shirt transfers. This descriptive overview summarizes the Direct-to-Film workflow, essential components, and best practices to help you start producing durable, vibrant designs. From choosing the right printer and film to mastering the transfer process and post-press care, you’ll gain practical know-how to experiment with Direct-to-Film transfers across a range of fabrics. As you refine your setup and test different settings, DTF Printing becomes a repeatable, reliable approach for small runs and customized apparel projects.