UV DTF transfer opens a new world of fabric printing with vibrant colors, durable adhesion, and flexible application across textiles. If you are a beginner, the idea of printing on fabrics using this method may seem daunting, but with the right approach you can achieve professional results. This introductory guide explains what the method is, why it matters for fabrics, and the basics you will need to start, including terms like UV DTF printing on fabric and DTF transfer for textiles. You will also see how it fits into fabric printing with DTF workflows, with an emphasis on rapid UV curing for transfers and a straightforward step-by-step process. By the end, you will be ready to create high-quality, long-lasting prints on cotton, blends, canvas, and more using this transfer technique.
In other terms, this approach relies on UV-curable inks and a direct-to-film concept that carries your artwork onto a specialized transfer film. Think of it as UV-curable direct-to-film printing for textiles, where the printed film is adhered to fabric with heat and pressure. LSI-friendly language for this method includes digital textile printing with UV curing, DTF film transfers for garments, and textile decor achieved through UV-ink film. Alternative phrases you might encounter include UV-printed transfers on fabric, UV-curable DTF on textiles, and fabric printing with a film-based workflow. Understanding these related terms helps designers compare options, gauge durability, and select the best workflow for speed and consistency.
1) Understanding UV DTF Transfer and Its Role in Fabric Printing
UV DTF transfer blends the precision of UV printing with the convenience of a transfer film, creating vibrant images that transfer cleanly to a wide range of fabrics. This approach is especially appealing for fabric printing with DTF because it combines rapid curing with strong adhesion, producing durable results on cotton, blends, canvas, and more. When discussing UV DTF transfer, you’ll often hear terms like UV DTF printing on fabric and DTF transfer for textiles, all pointing to a workflow that emphasizes color fidelity, detail, and practical applicability.
For beginners, the key advantage is a relatively straightforward path from artwork to finished product. By printing on a DTF transfer film with UV-curable inks and then curing the image before heat application, you can achieve high color density and sharp edges without the need for complex pretreatment in many cases. This makes UV DTF transfer a strong option for a first foray into fabric printing, while still offering the professional results required for small-business projects and promotional items.
2) Selecting Fabrics and Substrates for DTF Transfer on Textiles
Substrate choice has a meaningful impact on the final result of UV DTF transfer. Traditional cottons, poly-cotton blends, and canvas are common targets for fabric printing with DTF, offering solid adhesion and color stability. The broader substrate flexibility of UV DTF transfer means you can experiment with different textiles without heavy pretreatment, though some synthetics may require adjustments to heat and curing times.
When planning projects, consider fabric weight, weave, and finishing treatments because these factors influence ink adhesion and transfer durability. Using fabrics that are smooth and free of finishes that hinder bonding will help you achieve more consistent results across runs. Always run small tests on representative swatches to refine your approach before committing to larger batches.
3) Color, Resolution, and Detail: Optimizing UV DTF Printing on Fabric
Achieving vibrant color and crisp detail relies on careful design and precise color management. In UV DTF printing on fabric, high-resolution artwork and clean vector edges translate into sharp transfers with accurate gradients and fine lines. The use of UV-curable inks on a DTF film supports rich color depth, making it well-suited for complex graphics and photographic elements in fabric printing with DTF.
Calibrating color profiles, managing ink density, and validating print accuracy on fabric swatches are essential steps for consistent results. A well-planned workflow that includes color checks during the curing phase helps ensure your final print matches the design intent. By emphasizing configuration accuracy, you’ll maximize the benefits of UV curing for transfers while maintaining high fidelity across different fabrics.
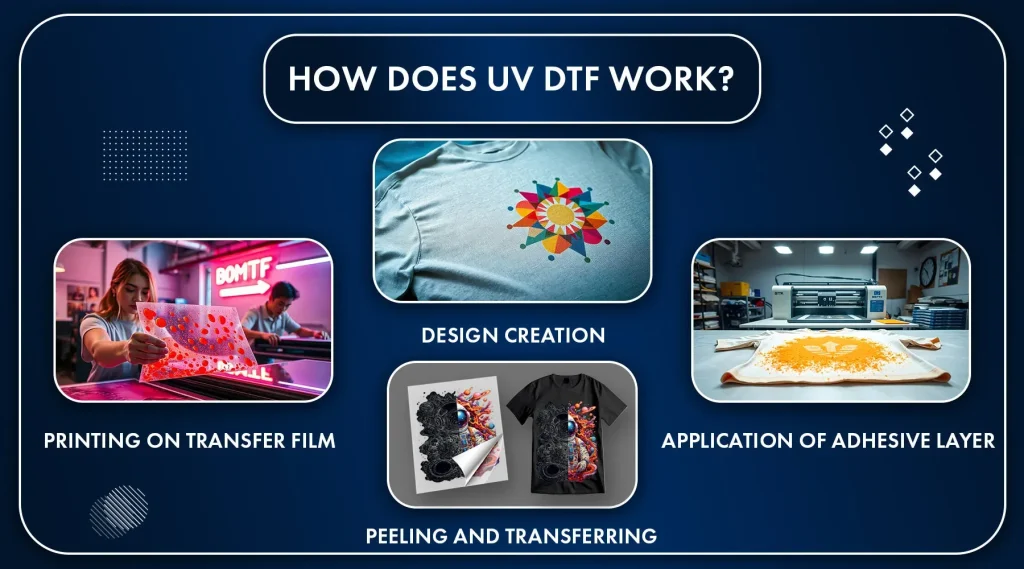
4) UV DTF Transfer Workflow: From Design to Finished Garment
A practical workflow for UV DTF transfer starts with design preparation: create artwork at high resolution, use layers to separate colors, and leave safe margins to prevent bleed during transfer. This phase sets the foundation for reliable results in UV DTF printing on fabric and aligns with best practices for DTF transfer for textiles.
Next comes printing on the UV-curable DTF film, curing the film, fabric preparation, transfer alignment, heat pressing, and post-press finishing. Each step—design, print, cure, transfer, and cure again—contributes to durability and colorfastness. Following a structured process ensures consistent outcomes across projects and helps you manage expectations when comparing UV DTF transfer with other fabric-printing methods.
5) Troubleshooting Common Issues in UV DTF Fabric Transfers
Color mismatch and blurry edges are common concerns for beginners and seasoned printers alike. To address these issues, verify color profiles, ensure accurate ink density, and confirm that the transfer film is correctly aligned with the fabric. Regular calibration and test prints on similar fabrics help mitigate color drift during UV DTF printing on fabric.
Adhesion problems and uneven texture often stem from fabric choice, heat settings, or insufficient curing. A small test patch can prevent wasting materials, while adjusting heat, time, and pressure can restore uniform adhesion. For persistent challenges, re-evaluate the compatibility of the chosen textile with the UV curing process and consider slightly modifying the curing duration for better bond strength.
6) Care, Longevity, and Maintenance of UV DTF Fabric Prints
Proper care supports the longevity of UV DTF transfers on fabrics. Turn garments inside out before washing and use mild detergents with cold or warm water to protect colors and prevent edge lift. Following care guidelines helps preserve the vibrancy of UV DTF transfer images and maintains their appearance over many washes.
Storage and handling also matter for durability. Store finished pieces away from direct sunlight and heat, and avoid ironing directly on printed areas. By allowing prints to cure fully and adhering to recommended washing and drying practices, you’ll maximize the lifespan of your fabric prints and keep them looking fresh across multiple uses.
Frequently Asked Questions
What is UV DTF transfer and how does UV DTF printing on fabric work?
UV DTF transfer is a process where UV-curable inks are printed onto a DTF film, cured with UV light, and then transferred to fabric with heat and pressure. This delivers vibrant, durable images with crisp edges, making it a strong option for fabric printing with DTF.
Which fabrics are best for UV DTF transfer and DTF transfer for textiles?
UV DTF transfer works on a wide range of fabrics, including cotton, poly‑cotton blends, canvas, and some synthetics. For textiles, cotton and blends typically yield the best adhesion and color, though pretreatments or adjusted heat may be needed for certain synthetics.
What equipment and materials do I need for UV DTF transfer on fabrics?
Key gear includes a UV-curable ink system or UV-capable printer, a DTF transfer film designed for UV curing, a heat press, a UV curing lamp, transfer paper or release sheets, a squeegee, a fabric to test on, and safety gear (gloves, ventilation).
What is the step-by-step workflow for applying UV DTF transfer on fabric with UV curing for transfers?
1) Prepare artwork at high resolution. 2) Print onto the UV DTF transfer film. 3) Cure the printed film with a UV lamp. 4) Prepare the fabric surface (wash/dry or pre-press). 5) Align and place the transfer on fabric. 6) Apply heat and pressure per film guidelines. 7) Peel the film according to warm/cool peel recommendations. 8) Allow the print to cure fully before handling or washing.
What are common issues with UV DTF transfer and how can I troubleshoot?
Common issues: color mismatch, blurry edges, poor adhesion, or uneven texture. Troubleshoot by calibrating color profiles and ink density, ensuring correct film alignment, adjusting heat/pressure/time, and testing on scrap fabric before production.
How does UV DTF transfer compare to other fabric printing methods?
Compared with sublimation or screen printing, UV DTF transfer offers broader fabric compatibility, fast UV curing, and crisp, detailed output. It can be more versatile for small runs or mixed-media textiles, though costs and equipment vary depending on volume.
| Aspect | Summary |
|---|---|
| What is UV DTF transfer? | A method that combines UV-curable inks printed on a DTF (direct-to-film) transfer film, cured with UV light, then applied to fabric using heat and pressure to produce a durable, vibrant image. |
| Why it matters for fabrics? | Offers high color fidelity and robust adhesion across a range of fabrics (cotton, blends, canvas), with versatile substrate compatibility and a relatively straightforward workflow. |
| Equipment and materials you’ll need |
|
| Understanding the step-by-step workflow |
|
| Materials and care tips |
|
| Common issues & troubleshooting |
|
| UV DTF transfer vs other fabric printing methods | Compared with sublimation or screen printing, UV DTF transfer offers broader fabric compatibility, quick curing, and crisp, high-definition output. Sublimation works best on polymer-coated or polyester fabrics, while DTF transfers excel across a wider range of substrates. |
| Best practices for long-lasting fabric prints |
|
| Care and maintenance after printing |
|