UV DTF transfer prints are redefining how designers apply vibrant, durable graphics to garments and textiles. This quick-start guide follows a proven workflow to achieve crisp lines, solid colors, and long-lasting results. If you’re a small business owner, hobbyist, or print shop expanding into textiles, this guide explains DTF transfer printing in practical terms. We’ll cover how to prepare artwork, choose reliable materials, and follow a step-by-step process to ensure consistent, professional results. By the end, you’ll have a solid foundation for producing durable prints that hold up wash after wash.
From a Latent Semantic Indexing perspective, ultraviolet-curable transfers offer a modern way to decorate garments by embedding vibrant imagery into textiles. These UV-based workflows are often described as UV-curable ink transfers or digital textile transfers that use heat press transfers for textiles to secure designs on fabrics. In practice, designers explore how to create UV transfers by preparing artwork, managing color, and selecting compatible films and presses, all within a shared semantic field. Using related terms like heat press transfers for textiles, UV DTF transfer prints on fabrics, and other cross-topic phrases helps readers and search engines recognize the topic without overusing a single label.
UV DTF transfer prints: A modern solution for heat press transfers for textiles
UV DTF transfer prints offer a contemporary approach to applying vibrant, durable graphics to garments through heat press transfers for textiles. By using UV-curable inks and a transfer film, this method delivers hardened, water-resistant results that resist fading after washing. Designers benefit from sharp details and fast production cycles, making it a strong option for small-batch orders and on-demand projects.
This approach aligns with the broader field of DTF transfer printing, but with UV chemistry that enhances color saturation on light fabrics and reduces setup time. For those exploring how to create UV transfers, the workflow emphasizes crisp edges, accurate color reproduction, and reliable adhesion across a range of substrates, from cotton to blends. The result is a versatile technique suitable for designers, hobbyists, and print shops expanding their capabilities.
What makes UV DTF transfer prints stand out in the DTF transfer printing landscape
UV DTF transfer prints stand out for their blend of detail fidelity and production efficiency. The UV-curable system hardens quickly, allowing for sharper imagery and smoother gradients than traditional plastisol or solvent-based inks. This results in photorealistic graphics, tight typography, and smoother color transitions even at smaller print runs.
Compared with conventional DTF transfers, UV DTF prints can offer faster curing and reduced post-processing. This makes them particularly appealing for businesses that need to turn around orders rapidly. For readers following a UV DTF printing tutorial, the emphasis on color management, pre-press preparation, and testing helps ensure consistency across batches and substrates, including fabrics with varying textures.
Planning design and color management for UV transfers on fabrics
Effective planning begins with a high-resolution artwork file (at least 300 DPI at target size) and a color-managed workflow. Calibrating monitors and creating ICC profiles ensures that the final transfer aligns with expectations, especially when using UV-curable inks that may behave differently from traditional inks. A test print on a sample fabric helps verify color density, sharpness, and edge fidelity before committing to a larger run.
For dark fabrics, incorporating a white underprint or light background can preserve legibility and brightness of light colors after transfer. A well-designed color ramp—from light to dark—helps minimize contrast loss post-transfer. This planning stage is integral to any DTF transfer printing project and lays the groundwork for reliable results when using UV inks for textiles.
From artwork to production: a step-by-step workflow for UV DTF transfer prints on fabrics
The design phase sets the foundation: create clean vector outlines for text and high-detail raster areas, and mirror the layout so the final image reads correctly on garments. Saving in a lossless format (TIFF or PNG) keeps transparency and edge detail intact, while separating white areas can help manage underprint behavior during transfer.
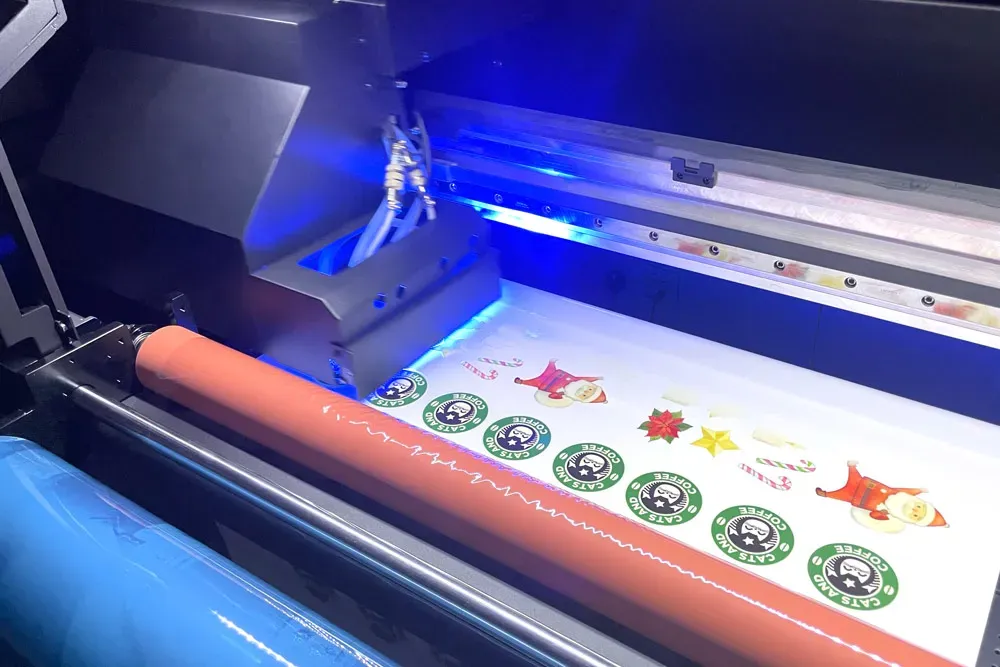
The production phase follows a clear workflow: load UV DTF transfer film, verify UV-curable inks, run a high-resolution print, and perform a brief post-print cure if required by the setup. After printing, pre-press the substrate to remove moisture, then transfer with controlled temperature and pressure. Proper cooling and optional post-press curing help maximize durability and wash-fastness for UV DTF transfer prints on fabrics.
Choosing materials, substrates, and equipment for reliable UV DTF transfer prints on fabrics
Selecting the right materials is crucial for consistent results. Use a UV DTF transfer film compatible with your printer and UV-curable inks, paired with a heat press capable of precise temperature, time, and pressure control. Protective silicone sheets or teflon-coated covers help distribute heat evenly and protect the fabric during transfer.
Equipment choices also influence reliability: a calibrated heat press, a lint roller to remove stray fibers, and test fabrics (cotton, blends, and polyesters) for validation. Substrate considerations matter—dark fabrics may require white underprints, while lighter fabrics reveal the true vibrancy of the UV inks. Following a UV DTF printing tutorial style approach, gather and document results to refine presets for each substrate.
Troubleshooting, finishing, and care to extend the life of UV DTF transfer prints on fabrics
Common issues include color shifts, halos, or adhesion problems. If colors appear dull or misaligned, recalibrate color profiles and reprint a proof, ensuring the transfer film and inks are within specification. Edge halos often signal clipping or misregistration during cutting, so reviewing your artwork outlines and transfer alignment can help. Adhesion problems may require adjusting temperature, pressure, or fabric dryness before pressing.
Finishing steps and aftercare are key to longevity. A gentle second press or a post-press cure can reinforce the bond on challenging fabrics. Provide customers with care guidelines—turn garments inside out, use cold water, and avoid high-heat tumble drying—to protect the print. By adopting these finishing practices, you can extend the life of UV DTF transfer prints on fabrics and satisfy repeat customers with consistent performance.
Frequently Asked Questions
What makes UV DTF transfer prints different from traditional DTF transfer printing methods?
UV DTF transfer prints use UV-curable inks and a transfer film to embed vibrant colors into fabrics. The UV curing creates a hardened, water-resistant layer that yields crisper detail, stronger color saturation, and faster production than traditional DTF transfer printing, making them well suited for small runs or custom orders.
How to create UV transfers using UV DTF transfer prints on fabrics?
Start with a high-resolution, color-managed design and a mirrored layout for transfers. Print with UV DTF transfer prints on a compatible film, verify color accuracy with a test print, then proceed with proper pre-press and a controlled transfer to ensure durability on fabrics.
In this UV DTF printing tutorial, what are the essential steps to achieve consistent results?
Key steps include design and color management, printer setup and media handling, color-verified proof printing, optional powder considerations, careful pre-press, the transfer cycle with correct temperature and dwell time, and post-press curing plus finishing checks to ensure wash-fast results.
What heat press settings and materials are recommended for heat press transfers for textiles using UV DTF transfer prints?
Use a heat press with precise temperature and time control. Typical settings are around 160-180°C (320-356°F) for 15-20 seconds, with even pressure and a protective sheet. Materials include UV DTF transfer film, UV-curable inks, silicone sheets or a teflon-coated cover, a press pillow, heat-resistant gloves, and a clean substrate, following manufacturer guidelines and testing on a sample first.
What are common issues with UV DTF transfer prints on fabrics and how can you troubleshoot them?
Common issues include color shifts, white halos, poor adhesion, and edge lifting. Troubleshoot by recalibrating color profiles and testing proofs, verifying precise alignment, ensuring the fabric is clean and dry, adjusting temperature, time, and pressure, and performing test presses on representative fabrics.
Which substrates work best for UV DTF transfer prints on fabrics and beyond?
UV DTF transfer prints work well on 100% cotton, cotton-poly blends, and certain polyesters. For dark fabrics, plan a white underprint to maintain brightness; for non-textile substrates like wood or ceramic, use compatible primers or topcoats and run small test batches to refine settings.
| Section | Key Points |
|---|---|
| What makes UV DTF transfer prints special |
|
| Planning your design and color management |
|
| Materials and equipment you’ll need |
|
| Step-by-step workflow for UV DTF transfer prints |
|
| Tips for achieving consistent results across substrates |
|
| Common issues and quick fixes |
|
| Substrate considerations and expansion opportunities |
|